
How to Speed up Your Magento 2 Store: 15 Tips to Follow
Table of Contents
Imagine that you walk into a brick-and-mortar store, and the cashier takes what feels like an eternity to ring up your purchase. Frustrating, right? Well, the same impatience applies to your online store visitors. Slow-loading websites can chase potential customers away faster than you can say “checkout.”
Now, when it comes to Magento stores, they’re often packed with product images, custom code, and third-party tools, which can put the brakes on your store’s performance if not optimized correctly. Sometimes, these issues might seem minor. But as a Magento developer, you understand that optimizing a store’s speed isn’t just a recommendation – it’s an absolute necessity.
So, where do you start, and what steps should you follow? Let’s dive right in and explore the roadmap to supercharge your Magento 2 store’s speed.
Why Does Speed Matter for Magento Websites?
Building an eCommerce website with Magento 2 is undoubtedly a great choice, given its robust features and flexibility. However, one of the most critical factors that can significantly influence the success of your Magento 2 store is speed. The speed at which your Magento store loads and operates profoundly impacts various aspects of your online business, including
- User Experience: Speedy page loads create a seamless shopping experience, encouraging users to explore your online store and make purchases.
- SEO and Visibility: Loading speed of your online store is crucial for SEO; faster websites rank higher in search results, increasing organic traffic and visibility.
- Conversion Rates: Quick-loading pages reduce cart abandonment rates and boost conversion rates, increasing sales and revenue.
- Competitive Edge: In the competitive eCommerce landscape, a fast Magento 2 store stands out, attracting and retaining customers.
- Brand Reputation: Speed directly impacts brand reputation, as a slow website can damage credibility and customer trust, hindering success in the long run.
How Can You Test Magento 2 Performance?
The first step in addressing speed issues is regularly conducting speed tests on your Magento site using third-party services like Pingdom Tools, GTmetrix, WebPageTest, or Google PageSpeed Insights.
You just enter your store’s URL and initiate the tests to pinpoint and address any speed-related problems during your maintenance cycle, ensuring Magento optimization.
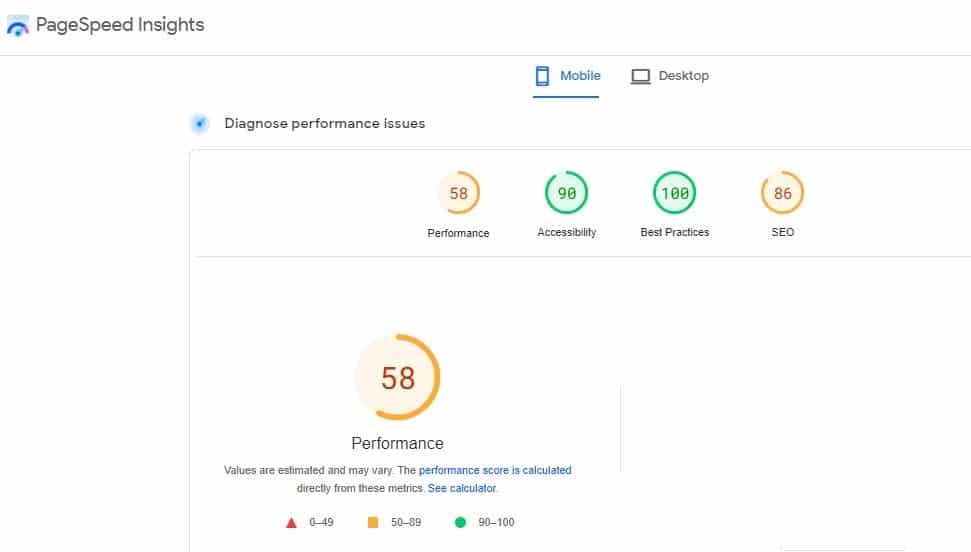
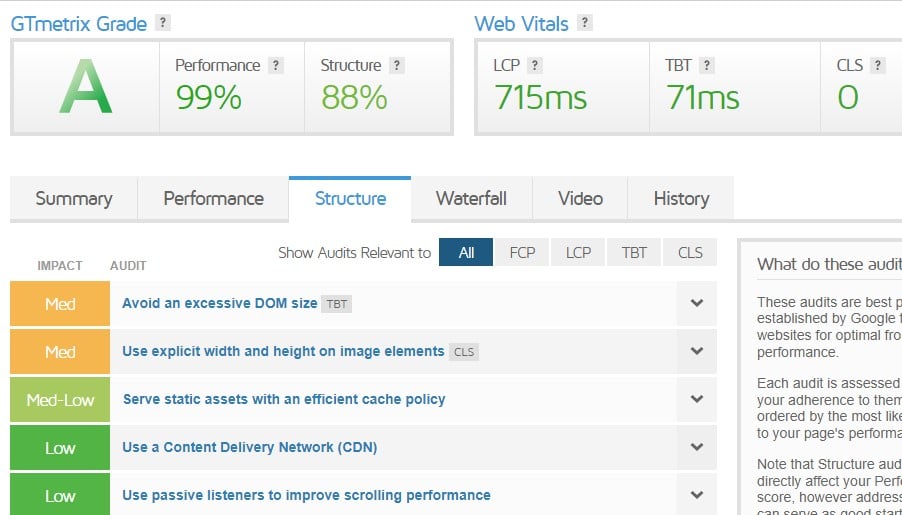
Result of Magento 2 Store Speed:
To give you a brief overview, here are some sample outcomes from various performance tests.
Google PageSpeed Insights
GTmetrix
Following a website speed test, let’s find out how to optimize your Magento 2 store’s speed. While different tips are available, we’ll focus on highly recommended strategies to improve your eCommerce store’s performance.
Essential Tips for Magento 2 Speed Optimization
Speeding up a Magento 2 website is crucial for providing a better user experience and enhancing search engine rankings. Here are some tips to optimize the speed of your Magento 2 store, along with code snippets where required:
1. Enable Full Page Cache (FPC)
Full Page Cache (FPC) is a critical performance optimization technique in Magento 2. It stores fully rendered HTML pages in Cache, reducing server load and improving page load times. When a user requests a page, Magento serves the Cached HTML instead of re-rendering the page, resulting in significantly faster response times.
To enable FPC in Magento 2, follow these steps:
- In the admin panel, navigate to Stores > Configuration > Advanced > System > Full Page Cache.
- Select your preferred Cache backend, such as Varnish or Redis, based on your server configuration.
- Configure the Cache backend settings, such as server host and port, as needed.
- Save the configuration.
Here’s an example of enabling FPC with Varnish in Magento 2:
    <cache>
        <backend>Varnish</backend>
        <backend_options>
            <server>localhost</server>
            <port>80</port>
            <grace_period>300</grace_period>
            <request_timeout>5</request_timeout>
        </backend_options>
    </cache>
Once configured, ensure that your server and Varnish (if chosen) are properly set up to work with Magento 2 FPC. This setup significantly enhances your store’s speed and scalability.
2. Use a Content Delivery Network (CDN)
A Content Delivery Network (CDN) is a network of geographically distributed servers designed to enhance website performance and reliability. It works by caching and delivering web content like images, stylesheets, scripts, and videos from servers located closer to the user’s geographical location. This reduces latency and speeds up page loading times.
To integrate a CDN with Magento 2, follow these steps:
- Sign up for a CDN service (e.g., Cloudflare, Akamai, or Amazon CloudFront) and obtain your CDN URL.
- In your Magento 2 admin panel, navigate to Stores > Configuration > General > Web.
- Under Base URLs (Secure), update the Base URL for Static View Files to point to your CDN URL, beginning with “https://”.
Example configuration in Magento 2:
Base URLs (Secure) -> Base URL for Static View Files: https://your-cdn-url.com/
- Save the configuration.
With the CDN configured, static assets like images and scripts will be fetched from the CDN’s edge servers, reducing the load on your web server and accelerating content delivery to visitors, ultimately improving your website’s performance and user experience.
3. Optimize Images
Optimizing images is crucial to improving website performance by reducing page load times. In Magento 2, image optimization involves compressing and resizing images without compromising quality. Here’s how to optimize images within Magento 2:
- Resize Images: Ensure that your product images are appropriately sized for their display on your website. Magento allows you to specify image sizes in the admin panel under Stores > Configuration > Catalog > Product Image.
- Compress Images: Use image compression tools or extensions to reduce image file sizes. You can manually compress images before uploading or use image optimization plugins available for Magento 2.
- Lazy Loading: Implement lazy loading for images so that they load only when they are visible in the user’s viewport. Magento 2 introduced native lazy loading for images in later versions.
Here’s an example of HTML code to implement lazy loading for images:
<img src="image.jpg" alt="Description" loading="lazy">
Optimizing images not only enhances website performance but also reduces bandwidth usage, benefiting both your site’s speed and user experience.
4. Minify CSS and JavaScript
Minifying CSS and JavaScript involves reducing the file size of these resources by removing unnecessary characters like white spaces, comments, and line breaks while preserving their functionality. This optimization significantly improves website loading times. In Magento 2, you can enable minification through the admin panel:
Minify CSS
- In the Magento admin, go to Stores > Configuration > Advanced > Developer > CSS Settings.
- Set “Minify CSS Files” to “Yes.”
- Save the configuration.
Minify JavaScript
- In the Magento admin, go to Stores > Configuration > Advanced > Developer > JavaScript Settings.
- Set “Minify JavaScript Files” to “Yes.”
- Save the configuration.
Magento will automatically minify CSS and JavaScript files when rendering pages. Alternatively, you can use third-party tools or build scripts to minify your source files before deployment. You should thoroughly test your site after minification to ensure it doesn’t break any functionality.
5. Enable Gzip Compression
It is a technique to reduce the size of web content transferred between the server and the user’s browser. It compresses text-based files like HTML, CSS, JavaScript, and XML before sending them, reducing bandwidth usage and speeding up page loading times. Here’s how to enable Gzip compression in Apache using .htaccess:
- Create or edit your website’s .htaccess file in the root directory.
- Add the following lines to enable Gzip compression:
    <IfModule mod_deflate.c>
    AddOutputFilterByType DEFLATE text/html text/plain text/xml text/css text/javascript application/javascript application/x-javascript
    </IfModule>
- Save the .htaccess file.
These directives instruct Apache to compress specified file types when serving them to users. Gzip compression can significantly improve website performance by reducing the size of data transferred over the network, resulting in faster page loads and a better user experience.
6. Use Lazy Loading for Images
Lazy loading for images is a technique used to defer the loading of images on a web page until they are needed, typically when they come into the user’s viewport or when the user scrolls down the page. This approach reduces initial page load times, as only the images visible to the user are loaded initially, improving site performance and reducing bandwidth usage. In Magento 2, you can implement lazy loading using HTML attributes:
Add the loading=”lazy” attribute to your image tags:
<img src="image.jpg" alt="Description" loading="lazy">
This simple attribute instructs the browser to load the image lazily, improving page loading speed and conserving resources. Most modern browsers support this attribute, making it an effective way to implement lazy loading for images in Magento 2 without requiring additional JavaScript or plugins.
7. Reduce Server Response Time
Reducing server response time is crucial for improving website performance. It refers to the time it takes for the webserver to process a user’s request and deliver a response. A faster server response time leads to quicker page loading and better user experiences. Here are some ways to achieve this:
- Optimize Code: Review and optimize your website’s code, including database queries and server-side scripts. Identify and fix bottlenecks and inefficiencies.
- Use Caching: Implement server-side caching mechanisms like opcode Caches (e.g., OPCache) and object caching (e.g., Redis or Memcached) to store and serve frequently requested data without reprocessing it.
- Content Delivery Network (CDN): Use a CDN to distribute static content geographically, reducing the load on your origin server and minimizing latency for users.
- Choose a Fast Hosting Provider: Select a reliable hosting provider with fast server hardware and adequate resources to handle your website’s traffic.
- Database Optimization: Regularly clean up the database, remove redundant data, and use database indexing to speed up queries.
- Server Configuration: Optimize your server’s configuration, including web server (e.g., Apache or Nginx), PHP, and database settings, to minimize response times.
- Load Balancing: Implement load balancing if your website experiences high traffic to distribute requests across multiple servers efficiently.
- Content Optimization: Compress and optimize images and minimize the use of external resources to reduce the server’s workload.
- HTTP/2: Use HTTP/2, which allows multiple requests and responses to be multiplexed over a single connection, reducing latency.
Regularly monitor your server’s performance and use profiling tools to identify and address any performance bottlenecks. Optimization is an ongoing process to maintain fast server response times.
8. Minimize HTTP Requests
It is a critical speed optimization technique to improve website performance. Each HTTP request made by a web page for resources like images, stylesheets, JavaScript files, and fonts adds overhead to page loading. Reducing these requests can significantly enhance site speed. Here’s how to minimize HTTP requests:
- Combine CSS and JavaScript Files: Merge multiple CSS and JavaScript files into fewer files to reduce the number of requests. Magento 2 offers built-in options to enable file merging in the admin panel under Developer settings.
- Use Sprites: Combine multiple small images into a single sprite sheet and use CSS to display the desired image portion. This reduces image requests.
- Inline Small CSS and JavaScript: For small code snippets, inline them directly into the HTML document to eliminate external requests. Use this technique cautiously for minimal files.
- Lazy Loading: Implement lazy loading for non-critical images and resources so they load only when they come into the user’s viewport.
- CDN: Use a Content Delivery Network (CDN) to distribute assets across multiple servers, reducing latency and the need for multiple requests to the same server.
By reducing HTTP requests, you can improve your website’s loading speed, resulting in a better user experience and potentially higher search engine rankings.
9. Enable Flat Catalog and Flat Category
Enabling Flat Catalog and Flat Category in Magento 2 is an optimization technique to improve the performance of your eCommerce store, especially when dealing with many products. Here’s an explanation, along with the necessary code:
Enable Flat Catalog
Enabling Flat Catalog combines multiple database tables into a single table, reducing the complexity of database queries and improving product listing page load times.
To enable Flat Catalog programmatically in Magento 2, you can use the following code:
    <?php
    use Magento\Framework\App\Config\Storage\WriterInterface;

    use Magento\Store\Model\StoreManagerInterface;
    $storeManager = \Magento\TestFramework\Helper\Bootstrap::getObjectManager()->get(StoreManagerInterface::class);
    $store = $storeManager->getStore();
    $writer = \Magento\TestFramework\Helper\Bootstrap::getObjectManager()->get(WriterInterface::class);
    $writer->save('catalog/frontend/flat_catalog_product', 1, $scope = 'stores', $scopeId = $store->getId());
Enable Flat Category
Enabling Flat Category does a similar operation as Flat Catalog but for the category structure, which can speed up category page loading.
To enable Flat Category programmatically in Magento 2, you can use the following code:
    <?php
    use Magento\Framework\App\Config\Storage\WriterInterface;
    use Magento\Store\Model\StoreManagerInterface;

    $storeManager = \Magento\TestFramework\Helper\Bootstrap::getObjectManager()->get(StoreManagerInterface::class);
    $store = $storeManager->getStore();
    $writer = \Magento\TestFramework\Helper\Bootstrap::getObjectManager()->get(WriterInterface::class);
    $writer->save('catalog/frontend/flat_catalog_category', 1, $scope = 'stores', $scopeId = $store->getId());
You should reindex your data and clear the Cache after making these changes in your Magento 2 store. These optimizations can significantly enhance the performance of product and category pages, especially with a large catalog.
10. Use a Caching Extension
A caching extension stores and serves Cached content, boosting website speed. Example: “Install Varnish for full-page caching. Configure via Magento settings.”
To install Varnish for full-page caching in Magento 2, follow these steps:
Install Varnish
Install Varnish on your server. The exact installation process depends on your server’s operating system. On a Linux server, you might use a package manager like ‘apt’ or ‘yum’.
For example, on Ubuntu:
    sudo apt-get update
    sudo apt-get install varnish
Configure Varnish
Edit the Varnish configuration file to specify the backend server (your web server). The configuration file location may vary depending on your server, but it’s often found at ‘/etc/varnish/default.vcl’.
Here’s a simplified example:
    backend default {
        .host = "127.0.0.1";
        .port = "8080";
    }
Adjust Magento Configuration
In your Magento admin panel, navigate to Stores > Configuration > Advanced > System > Full Page Cache. Set the “Caching Application” to “Varnish Caching” and configure the “Access List” with the appropriate IP addresses.
Flush Cache and Restart Services
Flush the Magento Cache and restart both Varnish and your web server (e.g., Apache or Nginx):
    sudo service varnish restart
    sudo service apache2 restart   # or sudo service nginx restart
Test
Test your website to ensure that Varnish is properly caching and serving pages. You can use browser developer tools or Varnish log files for debugging.
By installing and configuring Varnish for full-page caching, you can significantly improve your Magento 2 store’s performance by reducing the load on your web server and accelerating content delivery to visitors.
11. Upgrade to the Latest Magento Version
Upgrading to the latest Magento version is essential for security, performance, and access to new features. Here’s how to upgrade Magento:
- Backup: Before upgrading, backup your website files and database.
- Check System Requirements: Ensure your server meets the system requirements for the new Magento version.
- Update Extensions: Confirm that your installed extensions and themes are compatible with the target Magento version. Update or replace incompatible extensions.
- Get the Latest Magento Version: Download the latest Magento release from the official website or use Composer:
    composer require magento/product-community-edition=2.x.x --no-update
    composer update
- Update Magento: Run the upgrade commands:
    bin/magento maintenance:enable
    composer update
    bin/magento setup:upgrade
    bin/magento setup:di:compile
    bin/magento setup:static-content:deploy -f
    bin/magento maintenance:disable
- Test: Thoroughly test your website to ensure all functionalities work as expected.
- Monitor and Optimize: After upgrading, monitor your site’s performance and optimize as needed.
Regularly keeping your Magento store updated helps you stay secure, benefit from new features, and provide a better experience to your customers.
12. Optimize Database
Optimizing the database is crucial for maintaining a Magento store’s performance and responsiveness. Here’s how to optimize the database:
- Backup: Before making any changes, back up your Magento database to prevent data loss if something goes wrong.
- Use Magento’s Built-in Tools: Magento provides built-in tools for database optimization. Run the following commands via SSH:
    bin/magento indexer:reindex
    bin/magento cache:flush
- Clean Logs: Regularly clean up log tables like ‘log_customer’, ‘log_visitor’, and ‘log_quote’. You can do this with SQL queries:
    DELETE FROM log_customer;
    DELETE FROM log_visitor;
    DELETE FROM log_quote;
- Database Indexing: Ensure database tables are properly indexed to speed up query execution.
- Scheduled Tasks: Set up scheduled tasks to automatically clean up logs and reindex data regularly.
- Third-party Extensions: Be cautious with extensions that modify your database. Ensure they are optimized and don’t create unnecessary overhead.
- Monitor and Analyze: Use Magento’s performance monitoring tools or third-party solutions to continuously monitor your database’s performance and identify bottlenecks.
Optimizing the database helps maintain fast page loads and a smooth shopping experience for your customers. Regular maintenance ensures your Magento store operates efficiently.
13. Server Optimization
Server optimization is crucial for improving the performance and reliability of a Magento website. It involves fine-tuning your server’s settings and resources to ensure smooth operation. Here are some key aspects:
- Resource Allocation: Ensure your server has sufficient CPU, RAM, and storage for your Magento store’s needs.
- Web Server Configuration: Optimize settings in your web server (Apache, Nginx) to handle incoming requests efficiently. Configure gzip compression, keep-alive, and request timeouts for better performance.
- PHP Configuration: Adjust PHP settings such as memory_limit, max_execution_time, and OPCache settings for optimal Magento performance. Example:
php -c /path/to/php.ini bin/magento setup:upgrade
- Database Optimization: Tune your database server (MySQL, MariaDB) with appropriate configuration and indexing to reduce query response times.
- Content Compression: Implement server-level compression like Gzip or Brotli to reduce data transfer size.
- Security: Keep the server software and OS updated to patch vulnerabilities and enhance security.
- Load Balancing: For high traffic, consider load balancing across multiple servers to distribute requests evenly.
Regularly monitor server performance using tools like New Relic or server logs to identify and address bottlenecks, ensuring your Magento store runs smoothly and efficiently.
14. Use OpCode Cache
Opcode caching is a crucial technique for improving the performance of PHP-based web applications, including Magento 2. It works by storing precompiled PHP code, known as opcodes, in memory, reducing the need for repeated script parsing and compilation. This results in significantly faster execution times and reduced server resource usage.
To use opcode caching:
- Choose an OpCode Cache Extension: The most common choice is OPCache, which is bundled with the latest PHP version.
- Enable OpCode Cache: Verify that it’s enabled in your php.ini configuration file. Example configuration for OPcache:
    [opcache]
    zend_extension=opcache.so
    opcache.enable=1
- Configure OpCode Cache: Adjust settings like memory consumption, the number of accelerated files, and validation timestamps based on your server’s resources and requirements.
- Verify and Monitor: Check if opcode caching is active using ‘php -m | grep opcache’ and monitor performance improvements.
- Clear Cache (if needed): Clear the opcode Cache manually when making code changes or updates.
Opcode caching significantly enhances the speed and efficiency of PHP applications, including Magento, making them more responsive and reducing server load.
15. Minimize Extensions
Minimizing extensions in Magento 2 is essential to maintain website performance and stability. Extensions, while adding functionality, can also introduce complexity and potential conflicts. To minimize extensions:
- Audit Installed Extensions: Review all installed extensions and identify those that are no longer necessary or redundant.
- Remove Unused Extensions: Uninstall or disable extensions that are not actively used or are duplicating functionality. You can do this via the Magento admin panel or using Composer, depending on how the extension was installed.
- Replace with Core Features: If possible, replace extensions with Magento’s built-in features or custom development. Magento offers a wide range of functionalities out of the box, reducing the need for third-party extensions.
- Opt for Lightweight Extensions: When selecting new extensions, choose lightweight, well-coded options to minimize the impact on website performance.
- Regularly Update: Keep all extensions up to date to ensure compatibility with the latest Magento version and security patches.
- Test Thoroughly: Before making any changes, thoroughly test your website to ensure that removing or replacing extensions does not break functionality.
Minimizing extensions helps maintain a clean and efficient Magento store, improving performance, security, and ease of maintenance.
Also Read: 6 Reasons Which Make Magento the Best Fit for Your eCommerce Sites
Bottom Line
In the fiercely competitive world of eCommerce, where a split-second can make all the difference, the importance of speed optimization for your Magento 2 store cannot be overstated. By implementing effective strategies, you are not merely improving your website’s speed but also elevating the overall shopping experience for your customers.
Optimizing every image, fine-tuning each line of code, minimizing extensions, using OpCode Cache, optimizing the server, and reducing server response times are essential steps toward achieving a lightning-fast store. This not only results in quicker loading times but also boosts search engine rankings, improves visitor conversion rates and sets your store apart in the competitive digital landscape. Speed isn’t just a metric; it’s a powerful asset that can propel your Magento 2 store to success in the online marketplace.