A Step-by-Step Guide to Build a Headless WordPress Website with React
Table of Contents
In the rapidly evolving world of web development, WordPress has long been the platform of choice for content-rich websites. However, as user expectations for dynamic and interactive experiences increased, the need to separate the WordPress back-end from the front-end arose, and “headless WordPress” was born. By combining the robust content management capabilities of WordPress with the flexibility of React as a front-end framework, developers can now create highly customizable websites.
Sounds too technical? Don’t worry! You can hire dedicated WordPress developers to build your next website using headless WordPress. But before you do that, you might want to read this blog to explore the process of setting up a headless WordPress back-end combined with a React front-end. This will give you a clear understanding of how it all works.
Understanding Headless WordPress
Headless WordPress, or Decoupled WordPress, is an architecture that uncouples the front-end presentation from the WordPress content management system (CMS). Unlike traditional WordPress setups where the front-end and back-end are tightly integrated, in a headless architecture, the CMS handles content management, while the front-end is built separately with technologies like React, Angular, or Vue.js. The two communicate via RESTful or GraphQL APIs.
The Power of the REST API
The introduction of the REST API by WordPress developers in 2016 made headless architecture feasible. It replaced the traditional ‘What You See Is What You Get’ (WYSIWYG) approach with predefined content blocks, allowing developers to interact with plain content while focusing on crafting the user interface. Despite separating front-end and back-end, content updates remain accessible through the trusted WordPress CMS.
Understanding the Mechanics of Headless WordPress
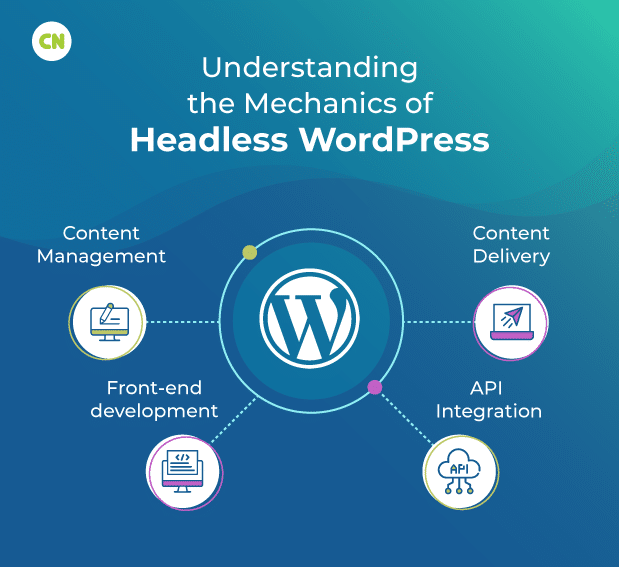
Content Management: In the realm of headless WordPress, the core functionality remains the same. WordPress is the leading content management system (CMS), allowing administrators and content editors to continue creating, managing, and publishing content through the familiar WordPress interface.
Content Delivery: What sets headless WordPress apart is its sophisticated content delivery mechanism. WordPress serves content through an API rather than generating HTML websites on the server side. This API acts as a channel, allowing front-end applications to request various data such as posts, pages, media, etc., all seamlessly retrieved from WordPress.
Front-end development: This is where innovation flourishes. The front-end development team begins building their application using the technology stack of their choice. This application uses the WordPress API and handles website and user interface display. This approach gives front-end applications full control over the user interface, design, and interactions, opening up endless creative possibilities.
API Integration: Seamless interaction between the front-end application and the WordPress back-end relies on API integration. The front-end application communicates with WordPress via dedicated API endpoints. It gracefully retrieves required content and adorns the user interface, forging a harmonious union of design and data.
Key Benefits of Headless WordPress
Multichannel Content Publishing: In today’s multitasking era, headless WordPress excels. It empowers you to simultaneously distribute content across various channels, enhancing efficiency. Be it your business calendar, IoT platforms, social media networks, or more, headless WordPress offers the versatility needed for content distribution.
WordPress Site Speed: User experience hinges on site speed. Statistics show that roughly 40% of internet users will abandon a site if it takes longer than 3 seconds to load. Headless WordPress steps in to optimize site speed while maintaining SEO-friendliness. Simplifying content loading for users ensures smoother experiences, which is particularly beneficial for content-rich websites.
Stack Integration: Headless WordPress proves a time and effort saver, seamlessly integrating with various digital platforms. This allows you to deliver content to multiple channels, ensuring consistency across platforms while freeing your team to focus on core business objectives.
Easy Redesign: Headless WordPress makes redesigning your website easy. There is no need to completely re-implement the CMS, streamlining the process efficiently and cost-effectively.
Advanced design options: Headless architecture separates content (text and images) from design elements stored on the front end. This separation allows for easy design changes and greatly expands the design possibilities of your website.
Improved site security: The headless WordPress front-end and back-end separation improves site security. A back-end hidden from the public is a harder target for hackers, reducing the risk of malware, ransomware, or DDoS attacks.
Progressive Web Application Possibilities: A distinguishing feature of headless WordPress is the ability to transform your website into a Progressive Web Application (PWA). This transformation enables real-time interaction within the browser, turning your website into a mobile application and improving the user experience.
Steps to Configure a Headless WordPress Back-end
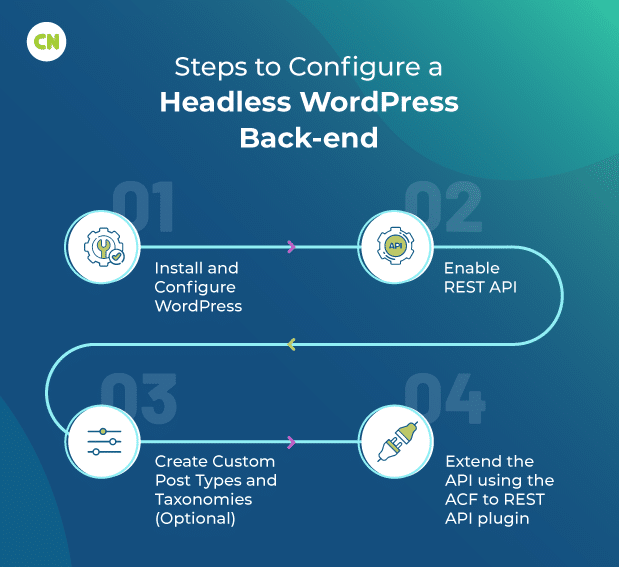
Step 1: Install and Configure WordPress
Setting up a headless WordPress back-end begins with installing and configuring WordPress. Here’s a quick breakdown:
- Choose a hosting provider or set up a local development environment.
- Download the latest version of WordPress from the official website.
- Upload your WordPress files or set up your local environment.
- Create a MySQL database and L user.
- Run the installation script and provide the required details.
- You are now ready to customize your WordPress CMS.
Step 2: Enable REST API
WordPress provides a RESTful API for resource access. To enable:
- Log in to your WordPress admin dashboard.
- Go to Plugins > Add New.
- Search for and install the “WP REST API” plugin.
- Activate the plugin.
The REST API is now active, and you can retrieve WordPress content with API requests.
Step 3: Create Custom Post Types and Taxonomies (Optional)
Use custom post types and taxonomies to organize your content effectively:
- To create one, click Use plugins like “Custom Post Type UI” and “Advanced Customization.” field”. they.
- Install and activate the plugin under “Custom Post Type UI”.
- Access “CPT UI” in the administrator menu.
- Click Add/Edit Post Type to define a custom post type.
- Specify labels, settings, and features.
- Save your changes.
Similar steps can be performed for custom taxonomies.
Step 4: Extend the API using the ACF to REST API plugin
Improve your content structure using the ‘ACF to REST API’ plugin.
- Install and activate “ACF to REST API”.
- In the ACF field group, select Show in REST API for the field you want to display.
- Save ACF settings.
ACF data is now accessible via the REST API and can be seamlessly integrated into your React frontend.
After following these steps, you’ll have a fully functional headless WordPress back-end that can integrate with your React front-end.
Why Integrate React with Headless WordPress?
Here are the reasons that inspire you to use React for your Headless WordPress project:
- Fast performance: React is known for its high speed and exceptional performance. It uses a virtual DOM (Document Object Model) to update only the parts of a web page that have changed. It results in faster rendering and a smoother user experience, which is crucial for modern websites and applications.
- Better user interfaces: Developers choose React.js for building interactive user interfaces. React’s component-based architecture allows developers to create reusable UI components. This modularity makes building and maintaining complex user interfaces easier, ensuring consistency and a great look and feel across your website or app.
- Seamless integration: React can seamlessly integrate with WordPress through RESTful APIs or GraphQL. This decoupling of the front-end and back-end allows for greater flexibility and scalability. You can use React to design the front-end while WordPress manages content in the back-end, ensuring a dynamic and interactive user experience.
Steps to Build Your React Front-end
Step 1: Setting Up a React Project
After configuring your headless WordPress back-end, create a React front-end to consume the WordPress API and render content. Here’s a concise guide:
- Install Node.js and npm if not already done.
- Use Create React App, a popular tool, to set up your project:
npm install -g create-react-app
npx create-react-app my-react-app
Replace “my-react-app” with your desired project name.
Step 2: Fetching Data from the WordPress API
Retrieve WordPress data using libraries like Axios or Fetch. Here’s a sample using Axios in a React component:
javascript

import React, { useEffect, useState } from 'react';
import axios from 'axios';

const BlogPosts = () => {
const [posts, setPosts] = useState([]);

useEffect(() => {
  const fetchPosts = async () => {
    try {
      const response = await axios.get('https://your-wordpress-site/wp-json/wp/v2/posts');
      setPosts(response.data);
      } catch (error) {
        console.error(error);
        }
      };
    fetchPosts();
}, []);

return (
  <div>
    {posts.map((post) => (
      <div key={post.id}>
        <h2>{post.title.rendered}</h2>
        <div dangerouslySetInnerHTML={{ __html: post.content.rendered }}></div>
        </div>
    ))}
    </div>
  );
};

export default BlogPosts;
Step 3: Rendering WordPress Content in React Components
Render WordPress data in React components. Create reusable components for different content types like blog posts or pages. Customize components to access specific data fields from the API response.
Step 4: Styling and Customization
Style your React front-end using CSS frameworks like Bootstrap or write custom CSS. Apply styles inline, use CSS-in-JS libraries like Styled Components, or separate styles into CSS modules or external CSS files. Here’s an example of applying inline styles:
javascript

const BlogPosts = () => {
  // ...
  return (
    <div>
      {posts.map((post) => (
        <div key={post.id} style={{ marginBottom: '20px' }}>
          <h2 style={{ fontSize: '24px', marginBottom: '10px' }}>{post.title.rendered}</h2>
          <div style={{ lineHeight: '1.5', color: '#555', fontSize: '16px' }} dangerouslySetInnerHTML={{ __html: post.content.rendered }}></div>
          </div>
      ))}
      </div>
  );
};
Step 5: Routing and Navigation (Optional)
Implement routing using React Router for multi-page or section navigation:
1. Install React Router:
npm install react-router-dom
2. Define routes and configure routing behavior in a separate file (e.g., App.js):
javascript

import { BrowserRouter as Router, Switch, Route } from 'react-router-dom';
import Home from './components/Home';
import About from './components/About';
import Blog from './components/Blog';

const App = () => {
  return (
    <Router>
      <Switch>
        <Route exact path="/" component={Home} />
        <Route path="/about" component={About} />
        <Route path="/blog" component={Blog} />
      </Switch>
    </Router>
  );
};

export default App;
3. Create component files (e.g., Home.js, About.js, Blog.js) for each route and define content and functionality.
Step 6: Optimizing Performance
Enhance performance by implementing techniques like code splitting, lazy loading, and caching to ensure your React frontend runs smoothly.
Step 7: Deployment
After successfully building and testing your React frontend locally, it’s time to deploy it for public access. You have various hosting options, such as cloud platforms like Netlify, Vercel, or AWS Amplify, as well as traditional web hosting providers.
To deploy your React app:
1. Consult your chosen hosting provider’s documentation for specific deployment instructions.
2. Typically, prepare your app for production using:
npm run build
This command optimizes and minifies your React app for deployment.
3. Upload the build output to your hosting environment or use CI/CD pipelines for automated deployments.
4. Ensure proper configuration for routing, including setting up redirect rules or using server configurations like Nginx or Apache to serve the React app correctly.
Also Read: Mastering WordPress: A Comprehensive 100-Point Checklist for Website Owners
Final Thoughts
In the ever-evolving web development environment, integrating a headless WordPress back-end with a React front-end has proven to be a powerful combination. Real-world examples and practical insights showed how this synergy allows businesses to control user experience, improve performance, and optimize content management. From news organizations to e-commerce giants, the versatility of this approach is clear. As you move forward on your journey, remember that separating front-end and back-end is not just a step but a leap into an era of improved website performance, simplified redesign, and increased security in the digital realm.
If you’re looking for custom development services, choose Capital Numbers, an award-winning software development company in India. We offer WordPress development services at affordable prices. Want to discuss your project? Call us today!

