
How to Create and Add Home Screen Widgets in a Flutter Mobile Application
Table of Contents
In the dynamic world of mobile app development, creating a personalized and engaging user experience is crucial. Flutter, a framework by Google for building beautiful, natively compiled, multi-platform applications from a single codebase, has gained immense popularity for its flexibility and ease of use. If you want to improve the user’s engagement with your Flutter mobile app, one of the options is to provide the home screen widget of your app, and the home_widget package from pub.dev can be a game-changer for this purpose.
What is home_widget Package?
HomeWidget is a package that makes creating HomeScreen Widgets easier on Android and iOS. HomeWidget does not allow writing Widgets with Flutter itself. It still requires writing the Widgets with native code. However, it provides a unified interface for sending data, retrieving data, and updating the Widgets. This package lets you easily create and update live widgets on the user’s home screen, providing a more personalized and interactive experience.
Getting Started
Create a new Flutter project and replace the `main.dart` file with the below code –
import 'package:flutter/material.dart';
void main() {
 runApp(const MyApp());
}


class MyApp extends StatelessWidget {
 const MyApp({super.key});


 @override
 Widget build(BuildContext context) {
   return MaterialApp(
     title: 'Flutter Demo',
     theme: ThemeData(
       colorScheme: ColorScheme.fromSeed(seedColor: Colors.deepPurple),
       useMaterial3: true,
     ),
     home: const MyHomePage(title: 'Flutter Demo Home Page'),
   );
 }
}


class MyHomePage extends StatefulWidget {
 const MyHomePage({super.key, required this.title});
 final String title;


 @override
 State createState() => _MyHomePageState();
}


class _MyHomePageState extends State {
 List todo = ['TODO 1', 'TODO 2'];
 final TextEditingController taskNameController = TextEditingController();


 addTodo() {
   showDialog(
     context: context,
     builder: (BuildContext context) {
       return AlertDialog(
         content: StatefulBuilder(
           builder: (context, setState) {
             return SizedBox(
               height: 200,
               child: Column(
                 children: [
                   const Text('Add new todo', style: TextStyle(fontSize: 22)),
                   const SizedBox(height: 24),
                   TextFormField(
                     maxLines: 3,
                     controller: taskNameController,
                     style: const TextStyle(fontSize: 14),
                     decoration: InputDecoration(
                       contentPadding: const EdgeInsets.all(20),
                       hintText: 'Task',
                       border: OutlineInputBorder(
                         borderRadius: BorderRadius.circular(15),
                       ),
                     ),
                   ),
                 ],
               ),
             );
           },
         ),
         actions: [
           ElevatedButton(
             onPressed: () => Navigator.of(context, rootNavigator: true).pop(),
             child: const Text('Cancel'),
           ),
           ElevatedButton(
             onPressed: () {
               if (taskNameController.value.text.isNotEmpty) {
                 setState(() {
                   todo.add(taskNameController.value.text);
                   taskNameController.clear();
                 });
               }
               Navigator.of(context, rootNavigator: true).pop();
             },
             child: const Text('Save'),
           ),
         ],
       );
     },
   );
 }


 @override
 Widget build(BuildContext context) {
   final ColorScheme colorScheme = Theme.of(context).colorScheme;
   final Color oddItemColor = colorScheme.primary.withOpacity(0.05);
   final Color evenItemColor = colorScheme.primary.withOpacity(0.15);


   return Scaffold(
     appBar: AppBar(
       backgroundColor: Theme.of(context).colorScheme.inversePrimary,
       title: Text(widget.title),
     ),
     body: ReorderableListView(
       padding: const EdgeInsets.symmetric(horizontal: 40),
       children: [
         for (int index = 0; index < todo.length; index += 1)
           ListTile(
             key: Key('$index'),
             tileColor: (index + 1).isOdd ? oddItemColor : evenItemColor,
             title: Text(todo[index]),
             trailing: const Icon(Icons.drag_handle),
           ),
       ],
       onReorder: (int oldIndex, int newIndex) {
         setState(() {
           if (oldIndex < newIndex) {
             newIndex -= 1;
           }
           final String item = todo.removeAt(oldIndex);
           todo.insert(newIndex, item);
         });
       },
     ),
     floatingActionButton: FloatingActionButton(
       onPressed: addTodo,
       tooltip: 'Add Task',
       child: const Icon(Icons.add),
     ),
   );
 }
}
Here, we have created a basic TODO app where you can add todos and reorder them.
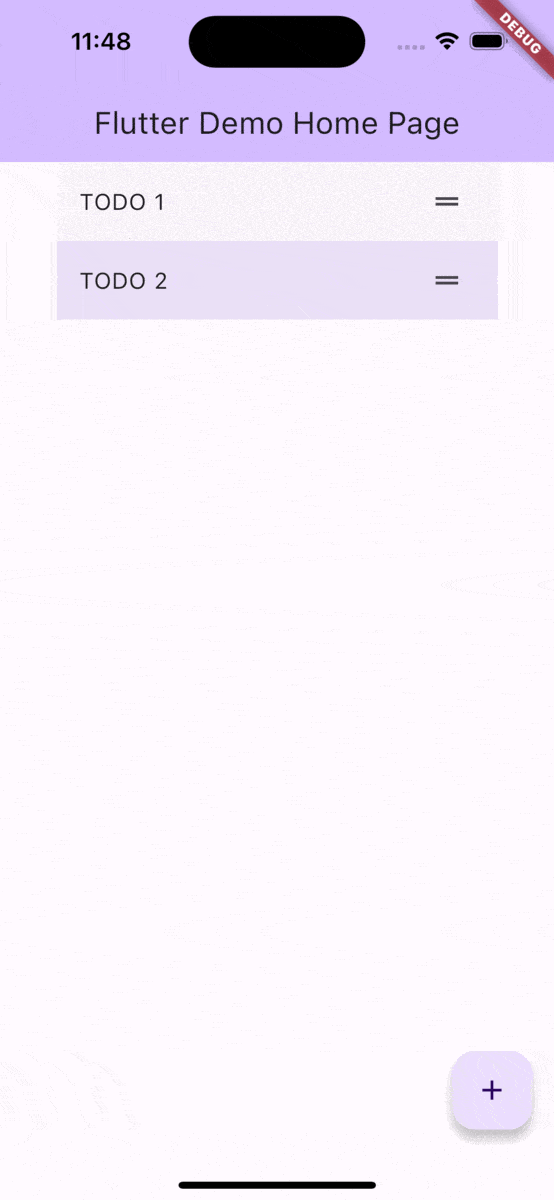
Now our objective is to show the first task from this TODO List in the widget on the Home screen of the device. For that, we need to perform the following steps:
- We will create a basic home screen widget for iOS and Android using Xcode and Android Studio, respectively.
- We will write dart code to update the content for the widget using the home_widget package.
- Adding native iOS functionality to show updated content.
- Adding native Android functionality to show updated content.
Creating a basic iOS Home Screen widget
- To add a Home Screen widget in iOS, open the project in Xcode.
- Select File → New → Target from the menu. This adds a new target to the project.
- A list of templates appears. Select Widget Extension.
- Type “SimpleTodoWidget” into the Product Name box for this widget. Clear both the Include Live Activity and Include Configuration Intent check boxes and Activate.
- Xcode creates and updates several files. We will work on the relevant files later.
Update your bundle identifier
In Xcode, navigate to the settings for your target. In the Signing & Capabilities tab, check that your team and bundle identifier are set.
Add the App Group to both the Runner target and the SimpleTodoWidgetExtention target in Xcode:
Select + Capability -> App Groups and add a new App Group. Repeat for both the Runner (parent app) target and the widget target.
Creating a basic Android Home Screen Widget
- To add a Home Screen widget in Android, open the project’ in Android Studio.
- After the project builds, locate the app directory in the top-left corner. Add your new Home Screen widget to this directory. Right click the directory, select New -> Widget -> App Widget.
-
Android Studio displays a new form. Add basic information about your Home Screen widget including its class name, placement, size, and source language
- Class Name box to SimpleTodoWidget
- Minimum Width (cells) dropdown to 3
- Minimum Height (cells) dropdown to 3
- Android Studio creates and updates several files. We will work on the relevant files later.
Adding the Dart Code
Now, we have the basic widgets created in Android and iOS. Please run and test them. We will now write dart code to update the content for the widget using the home_widget package.
To begin using the `home_widget` package, include it in your project’s dependencies. Open your pubspec.yaml file and add the following line:
dependencies:
 home_widget: ^0.4.1
After adding the dependency, run flutter pub get to fetch the package.
Update the `main.dart` file with the following code –
import 'package:flutter/material.dart';


// ADDED
import 'package:home_widget/home_widget.dart';


void main() {
 runApp(const MyApp());
}


class MyApp extends StatelessWidget {
 const MyApp({super.key});


 @override
 Widget build(BuildContext context) {
   return MaterialApp(
     title: 'Flutter Demo',
     theme: ThemeData(
       colorScheme: ColorScheme.fromSeed(seedColor: Colors.deepPurple),
       useMaterial3: true,
     ),
     home: const MyHomePage(title: 'Flutter Demo Home Page'),
   );
 }
}


// ADDED
// TO DO: Replace with your App Group ID
const String appGroupId = '';
const String iOSWidgetName = 'SimpleTodoWidget';
const String androidWidgetName = 'SimpleTodoWidget';


class MyHomePage extends StatefulWidget {
 const MyHomePage({super.key, required this.title});
 final String title;


 @override
 State createState() => _MyHomePageState();
}


// ADDED
void updateHeadline(String todo) {
 HomeWidget.saveWidgetData('todo', todo);
 HomeWidget.updateWidget(
   iOSName: iOSWidgetName,
   androidName: androidWidgetName,
 );
}


class _MyHomePageState extends State {
 List todo = ['TODO 1', 'TODO 2'];
 final TextEditingController taskNameController = TextEditingController();


// ADDED
 @override
 void initState() {
   super.initState();


   // Set the group ID
   HomeWidget.setAppGroupId(appGroupId);


   final newHeadline =
       todo.isNotEmpty ? todo.elementAt(0) : 'No task available';
   updateHeadline(newHeadline);
 }


 addTodo() {
   showDialog(
     context: context,
     builder: (BuildContext context) {
       return AlertDialog(
         content: StatefulBuilder(
           builder: (context, setState) {
             return SizedBox(
               height: 200,
               child: Column(
                 children: [
                   const Text('Add new todo', style: TextStyle(fontSize: 22)),
                   const SizedBox(height: 24),
                   TextFormField(
                     maxLines: 3,
                     controller: taskNameController,
                     style: const TextStyle(fontSize: 14),
                     decoration: InputDecoration(
                       contentPadding: const EdgeInsets.all(20),
                       hintText: 'Task',
                       border: OutlineInputBorder(
                         borderRadius: BorderRadius.circular(15),
                       ),
                     ),
                   ),
                 ],
               ),
             );
           },
         ),
         actions: [
           ElevatedButton(
             onPressed: () => Navigator.of(context, rootNavigator: true).pop(),
             child: const Text('Cancel'),
           ),
           ElevatedButton(
             onPressed: () {
               if (taskNameController.value.text.isNotEmpty) {
                 setState(() {
                   todo.add(taskNameController.value.text);
                   taskNameController.clear();
                 });
               }
               Navigator.of(context, rootNavigator: true).pop();
             },
             child: const Text('Save'),
           ),
         ],
       );
     },
   );
 }


 @override
 Widget build(BuildContext context) {
   final ColorScheme colorScheme = Theme.of(context).colorScheme;
   final Color oddItemColor = colorScheme.primary.withOpacity(0.05);
   final Color evenItemColor = colorScheme.primary.withOpacity(0.15);


   return Scaffold(
     appBar: AppBar(
       backgroundColor: Theme.of(context).colorScheme.inversePrimary,
       title: Text(widget.title),
     ),
     body: ReorderableListView(
       padding: const EdgeInsets.symmetric(horizontal: 40),
       children: [
         for (int index = 0; index < todo.length; index += 1)
           ListTile(
             key: Key('$index'),
             tileColor: (index + 1).isOdd ? oddItemColor : evenItemColor,
             title: Text(todo[index]),
             trailing: const Icon(Icons.drag_handle),
           ),
       ],
       onReorder: (int oldIndex, int newIndex) {
         setState(() {
           if (oldIndex < newIndex) {
             newIndex -= 1;
           }
           final String item = todo.removeAt(oldIndex);
           todo.insert(newIndex, item);


           // ADDED
           if (newIndex == 0) {
             updateHeadline(item);
           }
         });
       },
     ),
     floatingActionButton: FloatingActionButton(
       onPressed: addTodo,
       tooltip: 'Add Task',
       child: const Icon(Icons.add),
     ),
   );
 }
}
Update the iOS code to display the task
Open the `SimpleTodoWidget.swift` file in Xcode:
Replace the SimpleEntry struct with the following code:
// The date and any data you want to pass into your app must conform to TimelineEntry
struct SimpleEntry: TimelineEntry {
   let date: Date
   let task: String
}
This SimpleEntry struct defines the incoming data to pass into the Home Screen widget when updated. The TimelineEntry type requires a date parameter
Edit SimpleTodoWidgetEntryView to display the Task:
struct SimpleTodoWidgetEntryView : View {
   var entry: Provider.Entry


   var body: some View {
       Text(entry.task)
   }
}
Edit the Provider to tell the Home Screen widget when and how to update
struct Provider: TimelineProvider {
   func placeholder(in context: Context) -> SimpleEntry {
       SimpleEntry(date: Date(), task: "Placeholder Task")
   }


   func getSnapshot(in context: Context, completion: @escaping (SimpleEntry) -> ()) {
       let entry: SimpleEntry
       if context.isPreview{
           entry = placeholder(in: context)
       }
       else{
           // Get the data from the user defaults to display
//            let userDefaults = UserDefaults(suiteName: )
           let userDefaults = UserDefaults(suiteName: "group.todowidget")
           let task = userDefaults?.string(forKey: "todo") ?? "No task available"
           entry = SimpleEntry(date: Date(), task: task)
         }
       completion(entry)
   }


   //    getTimeline is called for the current and optionally future times to update the widget
   func getTimeline(in context: Context, completion: @escaping (Timeline) -> ()) {
       //This just uses the snapshot function you defined earlier
       getSnapshot(in: context) { (entry) in
           let timeline = Timeline(entries: [entry], policy: .atEnd)
           completion(timeline)
       }
   }
}
Comment out the SimpleTodoWidget_Previews
//struct SimpleTodoWidget_Previews: PreviewProvider {
//    static var previews: some View {
//        SimpleTodoWidgetEntryView(entry: SimpleEntry(date: Date()))
//            .previewContext(WidgetPreviewContext(family: .systemSmall))
//    }
//}
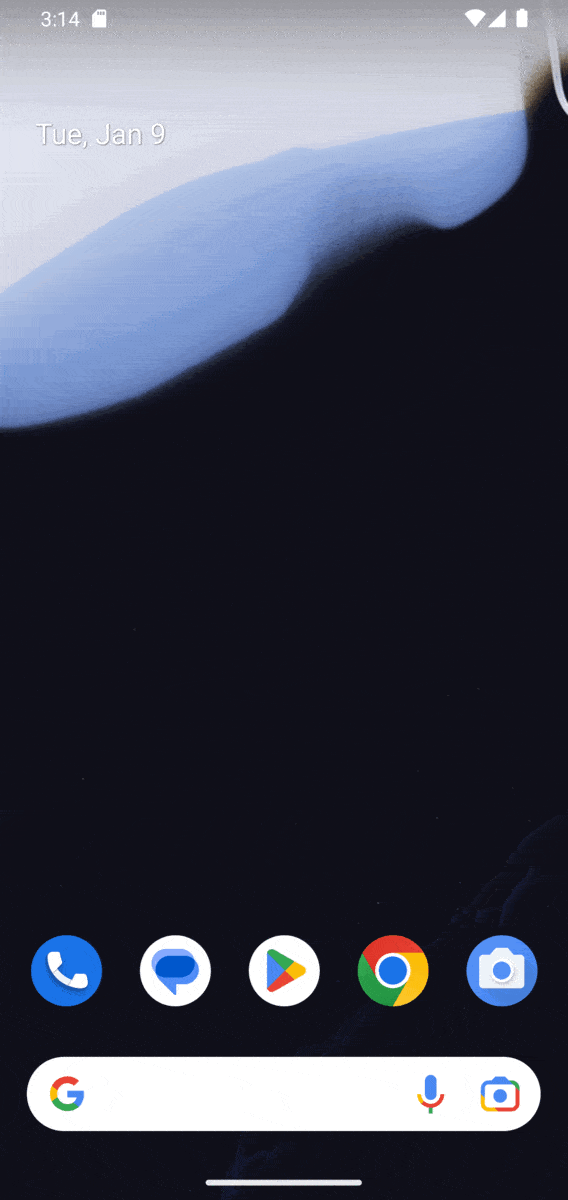
Save all files and re-run the app and widget target. You can now see the First Task of the TODO list of your Flutter app in the widget on the Home Screen.
You May Also Read: Flutter UI Design: Best Practices & Pro Tips for Beautiful Apps
Update the Android code to display the task
Open the res/layout/simple_todo_widget.xml file. It defines the structure and layout of your home screen widget. Select Code in the top right-hand corner and replace the contents of that file with the following code:
<RelativeLayout xmlns:android="http://schemas.android.com/apk/res/android"
   style="@style/Widget.Android.AppWidget.Container"
   android:layout_width="wrap_content"
   android:layout_height="match_parent"
   android:background="@android:color/white"
   android:theme="@style/Theme.Android.AppWidgetContainer">


   <TextView
       android:id="@+id/appwidget_text"
       style="@style/Widget.Android.AppWidget.InnerView"
       android:layout_width="wrap_content"
       android:layout_height="wrap_content"
       android:layout_centerHorizontal="true"
       android:layout_centerVertical="true"
       android:layout_margin="8dp"
       android:background="@android:color/white"
       android:text="Placeholder Task"
       android:textSize="24sp"
       android:textStyle="bold|italic" />
</RelativeLayout>
This XML defines one text view to display the Task. We need to open the `SimpleTodoWidget.kt` file to update its functionality. In this file, we need to modify the onUpdate method. Android calls this method for widgets at fixed intervals. The home_widget package tells Android to call onUpdate whenever we call updateWidget in the dart code. Replace the onUpdate method with the below code –
override fun onUpdate(context: Context, appWidgetManager: AppWidgetManager, appWidgetIds: IntArray) {
   // There may be multiple widgets active, so update all of them
   for (appWidgetId in appWidgetIds) {
       // Get reference to SharedPreferences
       val widgetData = HomeWidgetPlugin.getData(context)
       val views = RemoteViews(context.packageName, R.layout.simple_todo_widget).apply {


           val title = widgetData.getString("todo", null)
           setTextViewText(R.id.appwidget_text, title ?: "No task available")
       }


       appWidgetManager.updateAppWidget(appWidgetId, views)
   }
}
And make sure to add the below import in the imports section
import es.antonborri.home_widget.HomeWidgetPlugin
Save all files and re-run the app and widget target. You can now see the First Task of the TODO list of your Flutter app in the widget on the Home Screen.
You may also read: Beacon Technology – A Game Changer for Mobile App Development
Conclusion
The home_widget package in Flutter is a powerful tool in the realm of custom mobile app development. It empowers developers to manage home screen widgets, thereby offering a more personalized and interactive user experience. By integrating this package into your Flutter app, you can easily build and update widgets on the user’s home screen, enhancing overall engagement. Experiment with the provided examples, and start creating a more dynamic home screen experience for your users today! For a more in-depth exploration, you can access the source code here.
Seeking expert Flutter development services? Your search ends here! Our team, composed of highly skilled and experienced developers, is dedicated to delivering top-notch, custom-tailored solutions for your needs. Interested in exploring how we can help with your project? Book a call with us today to get started!

![]()